}
Showing posts with label favorite finds. Show all posts

Monday, July 2, 2012

DIY Chalkboard

I have been SO busy this past week!  My daughter and I were at church all week for VBS, we had company over for dinner on Tuesday night, and I had two appointments during the week!  Needless to say...we're tired!  Especially my daughter!

I finished up this chalkboard last week, but I finally had some time today to sit down at the computer and write up the blog post!  


I found this frame at a garage sale.  It was originally a mirror, but once I cleaned it up, I noticed a small scratch.  Sound familiar?  I obviously need to be more diligent about checking things out thoroughly before purchasing them!  Here it is fresh from the garage sale.


I didn't want to use it as a mirror even if the scratch was really small, so I took the mirror out and replaced it with hardboard.  We got a big sheet of it since I'm sure I'll be using more of it in the future!  


My husband  cut out the size I needed for my project (because I think he not-so-secretly enjoys helping me when it involves power tools!) and I sprayed it with spray primer.  I wasn't going to prime it, but the hubby thought the chalkboard paint would soak in too much on such a porous surface.  So, I decided to listen to his wisdom just this once and prime it!  Haha!


After two light coats of primer, I was ready for the chalkboard paint.  I used the paint you have to brush or roll on as opposed to the spray stuff.  No reason, really.  That's just what I used for my last chalkboard project and we had a ton left over, so that's what I used!  Here is the hardboard painted with chalkboard paint.


I used a foam brush when I painted with the chalkboard paint this time.  I will say, as you can see in the next picture, it does leave a texture to board.  I'm still debating on whether or not I like the texture.  I think if I knew I was going to sell a piece, I'd use a small roller to apply the paint for a smoother finish.  

After the paint dried for 24 hours (okay, maybe a little less!), I rubbed a piece of chalk all over the board.  See the texture come out?  Apparently you have to rub the chalk on and then wipe it off to make chalk work on it.  I don't know if that's true or not, but I've heard it so many times that I just do it every time now!


Next, I had to attach the chalkboard to the frame.  I tried wood glue at first, but it just didn't hold, so I tacked a few finishing nails into the back of the frame to hold it in there securely.  


I am hoping to eventually have a gallery wall on our living room wall filled with family pictures and I knew I wanted this to be included in it somehow.  But since this is the first piece, I don't know exactly where it is going to end up on the wall.  So, I used Command adhesives to hang it.  It's much better than using a nail, since I may end up moving it in the future.


I believe there are specific Command adhesives for picture hanging, but these are left over from a hook we had once used and they worked perfectly for this.  I may use the picture hanging strips for the rest of the pieces on the gallery wall, so that I can change them around if I want...and I won't have a bunch of holes in the wall!


I should add in here before I go too far, that I painted the frame with  Annie Sloan chalk paint in Provence and then used a coat of clear wax over that.  The frame does look a little distressed/dirty and that's because I was using dark wax on something else before I waxed this frame, so my brush had some dark wax on it already.  I'm okay with that, though!  I think it turned out nicely!


Now, on to the rosettes.  I already had made the canvas rosette for a different project, but ended up using it on this.  I put it on the frame and felt like it needed a little something extra, so I made the yellow one.  To make a rosette, first you cut (or rip) a strip of fabric.  This one is a little small, so the rosette turned out a little small.  The bigger you want your rosette to be, the bigger (longer AND thicker) you need to cut your fabric strip.


As you can see, the edges can be a little jagged.  It just adds to the character of the flower!  

Next, tie a knot in the end of the fabric strip.  Then you just start twisting the fabric and turning from the knot.  I don't have a picture of this part because my husband was sleeping at the time and I was working on this alone.


I kind of "winged" it as I went anyway, so a picture probably wouldn't do you any good!  I think it's good to wing it sometimes and just let it turn out how it's gonna turn out!  ;)

And here is my rosette!    


I used hot glue to keep the rosette together.  I just picked several places on the back and front to dab a little glue, held it for a couple seconds each time, and it held together just fine.  I also used the hot glue to attach the rosettes to the chalkboard frame.  Just a couple dabs and they were good to go!


Here are a couple shots of the final product.  


As you can see, it looks a little strange just hanging on the wall above our couch all by its lonesome.  But as I find more garage sale frames, I'll be adding to my gallery wall collection! 


Thanks so much for stopping by!  I really appreciate all the comments being left lately!  I'm definitely feeling loved!  :)  


I'm linking up to the following blogs to share my project!

Cherished Bliss - Craft and Tell
Today's Creative Blog - Get Your Craft On
Domestically Speaking - The Power of Paint Party
{Primp} - Primp Your Stuff Wednesday
Embracing Change - Creative Inspirations
Restore Interiors - Restored it Wednesday
Liz Marie Blog - Link Up With Me, Liz Marie
House of Hepworths - Hookin Up With HoH
Freckled Laundry - {air your laundry friday} Textile Party
The Shabby Creek Cottage - Transformation Thursday
Miss Mustard Seed - Furniture Feature Friday
Tatertots and Jello - Weekend Wrap Up Party

Monday, June 4, 2012

My very first flea market adventure

We’re in Minnesota this week spending time with my husband’s aunt and uncle on their 90 acre sheep farm, but I wanted to stop over and share my very first trip to the flea market with you all.  On Memorial Day weekend, I went to a flea market on the west side of the state with my daughter and my in-laws.  Although the temperature was somewhere in the low 90s that day, we had a great time and I found some fun pieces.
Here are a couple shots of the market.  It was absolutely huge and went on forever and ever!  We didn’t even see the whole thing that day!  After several hours in the hot sun, we just couldn’t take it anymore, so we eventually had to quit.  But I know I’ll be back someday!


And here is what I found at the market.  The price on the table was perfect, I just couldn’t pass it up!  And when I saw this little chair, I instantly fell in love.  The legs are just beautiful!  The seller said it was originally a vanity chair; that’s why the back is so low.  I love finding out the history behind pieces.  It makes it that much more special to me!  

This window was my first purchase of the day.  We actually already have an old window hanging above our bed, but I just really loved this one, too!  I picked it because it has those two “hangers” on the top.  Honestly, I’m not sure if they’re original or not - I don’t know what they would have been used for - but I thought it was perfect for hanging on a wall as we did in our bedroom, so I snatched it up!  


Lastly is this dresser.  A lot of furniture at the market was priced way above what I could afford - especially since I’m buying pieces to refinish, not to keep as they are.  I was getting pretty discouraged at times and figured by the time I got to a booth, all the well-priced pieces would be gone.  We walked by this booth and I saw this dresser and thought I’d pop in to see what outrageous amount they wanted for it.  To my surprise it was marked at a really reasonable price.  I was ready to buy it on the spot, but thought I’d ask if they could give me a better price on it.  No sense in paying more than you have to, right?  Well, I’m glad I asked because the seller came down $20 off the already affordable price!  I was so happy I whipped out my money and handed it over!  That thing was mine and I wanted to make it official as quickly as possible!  Haha!  


I’m so happy I went to this flea market and really had a great time looking around at everything, but I can’t tell you about my fun trip without giving a shout out to my in-laws, especially my father-in-law.  He was so sweet about hauling all my stuff to their vehicle and getting it all in there for me.  And did I mention it was over 90 degrees that day?!  Thank you Wayne and Terri for all your help!  I can’t express how much it means to me!

Nana, Papa, and Rylan at the Jenison Memorial Day parade


I can’t wait to show you the “afters” these great finds!
Take care!


I'm linking up to the following blogs to share my project!

Miss Mustard Seed - Furniture Feature Friday

Tuesday, May 1, 2012

A painted nightstand...and my new venture


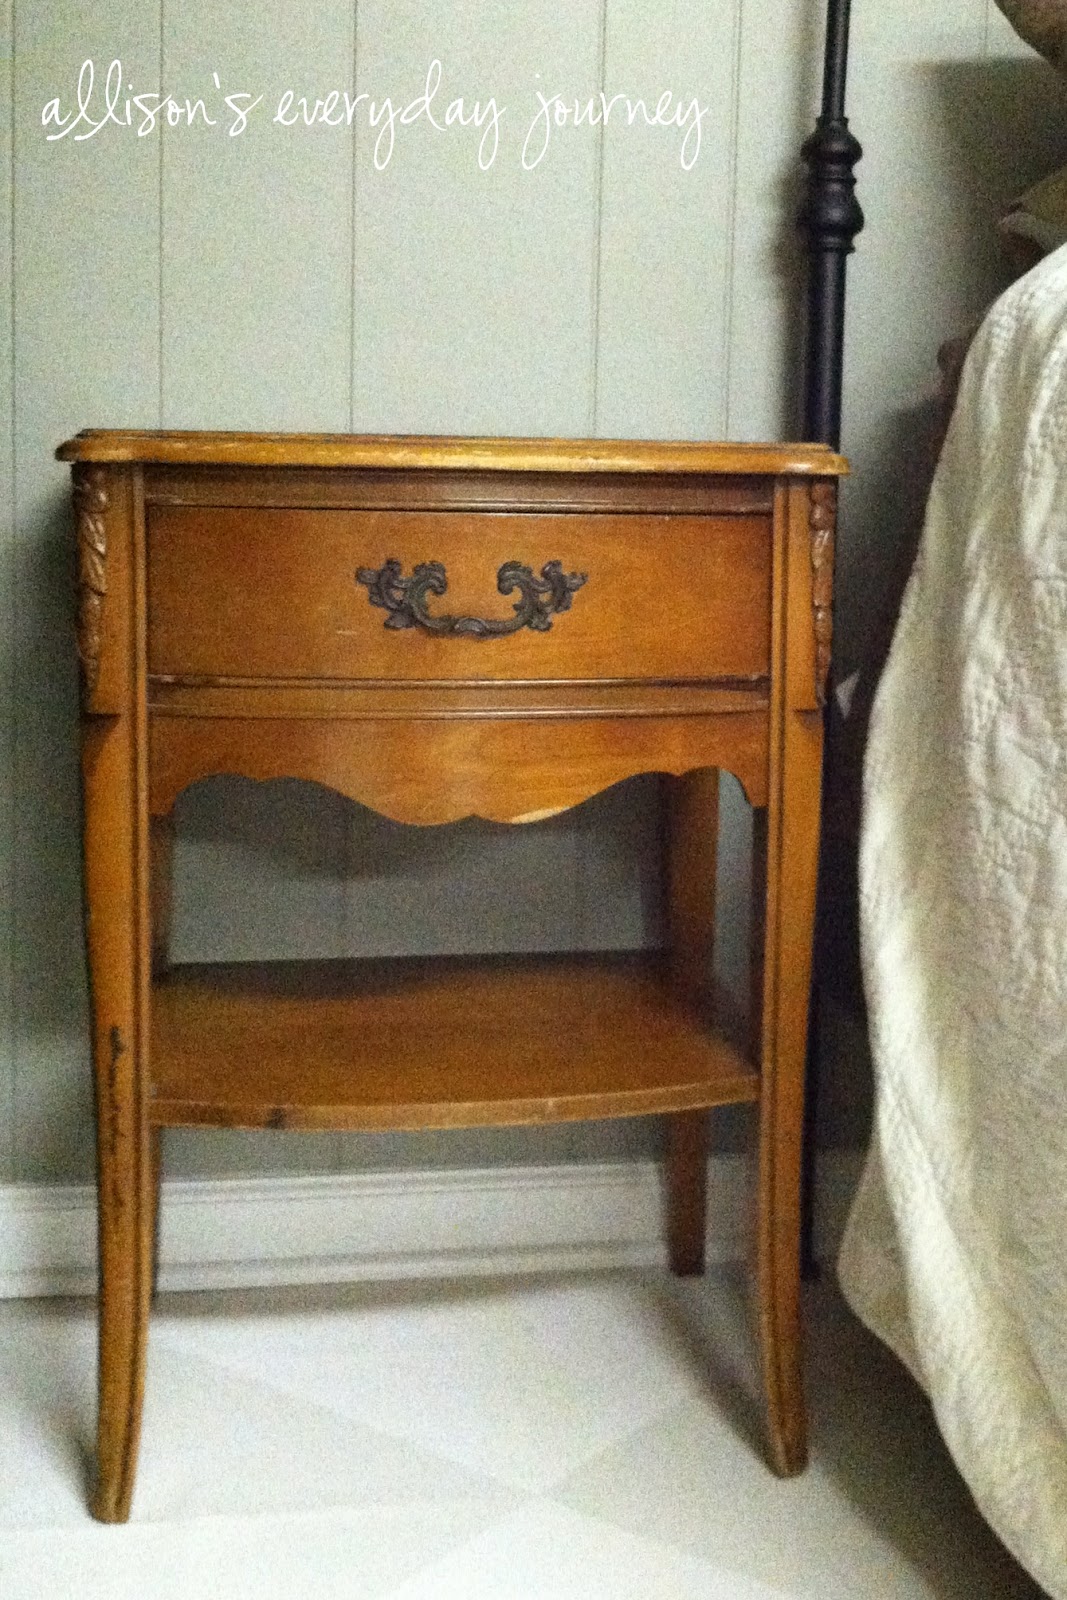
I’m so excited to share my nightstand with you!  I got this baby off Craigslist for $25 and was super excited about it!  It was my first time buying anything off Craigslist and it went really well, actually.  When I bought the nightstand, I really didn’t have a place for it in our home.  I knew I wanted something old and I wanted a piece I could paint/refinish.  I just started cruising Craigslist and found this beauty and thought it would be a fun piece to start on.  When I got it home, I tried it out in different places and finally ended up putting it next to the guest bed in the basement.  My mother-in-law kept telling me we needed a nightstand down there every time she spent the night, so I thought this would do the trick.  And, for $25, plus a few supplies to refinish it, it cost less and has much more personality and detail than anything I could have bought at a chain store.

before 
(sorry about the quality of this photo - it was taken with my phone)

after


I knew before I bought it that I wanted to do a stained top and paint the rest of the piece.  I had seen that look over on Miss Mustard Seed’s blog and thought it looked so sharp.  Since this is the first piece I’ve ever painted - well, besides spray painting - I was a little nervous and didn't know where to start.  I had heard a LOT about Annie Sloan Chalk Paint and really wanted to try it, but wasn’t ready to commit to the high price tag yet.  And my husband REALLY wasn’t ready!  ;)  So, my husband went searching all over the ‘net to see if there was a “better way” and found a recipe to make your own chalk paint.  To make it, you use 1 part Plaster of Paris and 2 parts latex paint.  The homemade chalk paint turned out pretty well, but I’m not sure I love it.  I really want to buy a quart or a few sample pots of ASCP to see how it works and compare it to the homemade chalk paint I made.  From what I’ve been reading, I’m going to assume that  the ASCP is far superior to my homemade chalk paint.  I guess I just need to save up a little money and just go for it.  And ya know what?  If I hate it, I can just try something else.  I know I can just use latex paint, but I've been hearing so much about ASCP, I can't get it out of my head!
I was excited to start on my project, but wasn’t sure how I would like it once I got going on it.  It is a lot of work at times, but I found that the painting, distressing, waxing was such a stress reliever for me.  It gave me time to be alone with my thoughts and I could even let my creativity out a little bit.  I’ve had a hard time separating myself from being a mom since I had my daughter and I found (so far, at least) that painting is something that can give me that separation.  Not that I don’t want to be a mom, I just need to be Allison, the person, sometimes!  I need some time to be able to think about things other than sippy cups and potty training!

This painting project brings me to my new venture I want to share with you.  I have decided to start buying and refinishing/painting antique furniture.  I have always loved the look of antique furniture when done in a tasteful way.  I love the look of an updated home with a few gorgeous antique pieces thrown in there to spice it up a little.  Heck, I would LOVE to live in an old farmhouse, renovate it and have antique furniture tastefully strewn about the home.  But that is only in my dreams since I’m pretty sure my hubby doesn’t share those same thoughts!  Oh well, maybe one day I'll change his mind!  Anyway, I want to start refinishing pieces for my home that will have a purpose and meaning for my home and family.  Eventually I would love to start selling my pieces and be able to contribute to the family income - being a stay at home mom - while doing something I love at the same time.  I don’t know what this will look like for me in the future.  Selling my pieces in an antique store?  Selling pieces online?  Doing custom orders?  I have no idea, but I’m open to just about anything right now!  So, I’ll be researching a lot more.  Colors and finishes I like.  Styles of furniture I want to focus on - good thing I saved my furniture book from college when I was going to be an interior designer!  I knew I should hang on to that book for a reason.  I kept taking it with us when we would move to different houses.  I felt like God was telling me to just keep it, that it may come in handy someday.  Well, maybe this is why He had me hang on to it.  Now I just need a larger vehicle so I can buy bigger pieces of furniture!  ;)
Thanks so much for checking out my new project!  Feel free to leave a comment if you have any questions.  

* Update:  I forgot to tell you ... I used Sherwin Williams Versatile Gray on the body and Minwax Dark Walnut stain on the top.

I'm linking up to the following blogs to share my project!  (This is my first time "linking up" anywhere...we'll see how it goes!)

Today's Creative Blog - Get Your Craft On
{Primp} - Primp Your Stuff Wednesday
House of Hepworths - Hookin Up With HoH
Miss Mustard Seed - Furniture Feature Friday
Tatertots and Jello - Weekend Wrap Up Party

Sunday, April 29, 2012

Garage Sale Finds

Just wanted to share a couple quick garage sale items I found while out with my new friends Heather and Rebecca this weekend.  We went to a ton of garage sales on Friday in South Lyon where they were having a city wide sale.  It was the first time I’d gone to so many garage sales in one day and I had a great time!

Here is a crib spring that I got for FREE!!  


This was our first stop and I saw the crib sitting out front with a free sign on it.  I really didn’t need or want the whole crib, but I had seen something cool done with a crib spring over on The Handmade Home and thought of it right away when I saw that spring.  I asked the woman if I could just have the spring and she hesitated a bit because she really wanted to “sell” it with the crib.  After several seconds she said I could just have it!  I was SO happy!  I never thought I’d even find a crib spring let alone get one for free!  I know everyone probably thinks I’m crazy, but I’m super excited about it!  (And I really hope it turns out as cool as the inspiration project did!)
My other find at the garage sales was this mirror.  

Not sure if I want to hang it this way...
...or this way.  (Don't mind my toddler strutting in the mirror reflection!)

I know, it’s a bit dated, but I think with some paint it will be a fun piece to put in our entryway!  It’s not exactly our style, but I got it for $2.00!  We can always update it with something else when I find the "perfect piece".  The lady selling it was selling everything at her garage sale for $5.00 or less!  Now that’s my kind of garage sale!  She even had a couple dressers!  It was crazy!

Alright, well that’s it on the garage sale finds.  I did get a few other things, but mostly just clothes and toys for Rylan, so I won’t bore you with those!
Check back soon to see how I’ve transformed my garage sale finds.  I’m excited to share the end results with you!