And here you can see the detail of where the mirror was flaking off.

I saw it and immediately thought I had just spent one dollar on trash. I’d just have to throw it away when I got home. One for the “lesson learned” file.
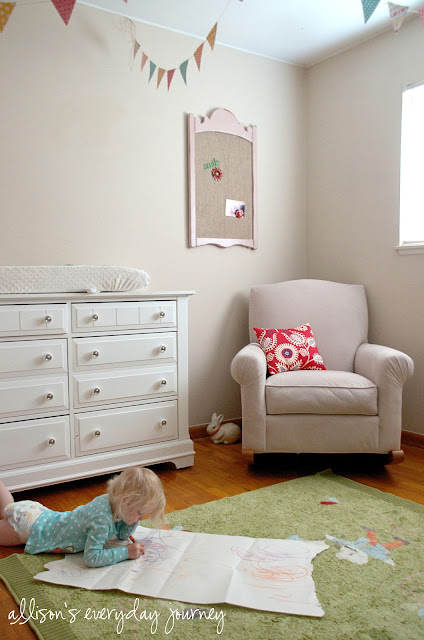
Well, somewhere between then and now I had a brilliant idea. Why not try to take the mirror out and see if I can still use this cool frame for another purpose? I thought about making it into a chalkboard, but had done a chalkboard recently and thought I should try something else. When I went to the flea market a couple weeks ago I picked up some great burlap sacks (which I forgot to picture on that post). I was thinking of using them for another project – and still am – but I thought about this frame that I didn’t know what to do with and it came to me to make a burlap memo board.
After I took out the mirror, I painted the frame with Annie Sloan Chalk Paint in Emperor's Silk (red). Then I painted over that in a light pink ASCP color, Antoinette. Once the red color was totally covered and the paint was dry, I used a damp rag to rub off some of the pink paint in places. It is a fun way of distressing that I've really enjoyed the most, I think. It gives me freedom to make it look the way I want and I don't get a ton of "scratch" marks from using sand paper.
At first I was going to make it a cork board and use push pins, but I’ve never been a huge fan of push pins, so I decided to make it magnetic. I bought a piece of sheet metal from The Home Depot and laid the burlap over it, but you could see the metal through it. After wracking my brain, I came up with an idea. We have these old, ugly, faded pillowcases on our guest bed that I absolutely hate, but haven’t been willing to replace. Well, they just so happen to be the perfect color. So, I cut one of the pillowcases in half and glued the sheet metal to it (which I had already glued to a piece of foam board to help stabilize it) and then wrapped the burlap around the whole thing and glued that down.
I'm linking up to the following blogs to share my project!
Cherished Bliss - Craft and Tell
Today's Creative Blog - Get Your Craft On
Domestically Speaking - The Power of Paint Party
{Primp} - Primp Your Stuff Wednesday
Embracing Change - Creative Inspirations
Restore Interiors - Restored it Wednesday
Liz Marie Blog - Link Up With Me, Liz Marie
The Shabby Creek Cottage - Transformation Thursday
Miss Mustard Seed - Furniture Feature Friday
Tatertots and Jello - Weekend Wrap Up Party


It was a good post Allison! And the picture with Rylan looks like it could be in a magazine!!!
ReplyDeleteThanks Amber!
DeleteSuch a darling idea! LOVE the red tones peeking through the pink. So fleaChic!
ReplyDeleteThis is so adorable! I love the burlap : ) I totally think you should keep explaing your posts! I love knowing how people got to where they were going with their projects : ) I'm sharing your adorable blog on my facebook page. So glad I found you!!
ReplyDeleteWow! Thank you so much for the compliments and for sharing my blog! That's so sweet of you! :)
DeleteYou are so creative, Allison! I love your wowk and think it's great to hear your thought process. Hearing someone else's creative process always gets my creative juices flowing, too.
ReplyDeleteSo cute!!! I love the pink with the hints of red. I am so in love with burlap right now so I may steal this idea for my twins room.
ReplyDeleteThat is really cute Allison!
ReplyDeleteThanks for linking up this week!
Stacey of Embracing Change
Flaky mirrors are my favorite but the burlap version looks great too. xo Jami
ReplyDelete