As you know, we moved to a new-to-us house a couple months ago. And when we bought it we were SO excited to have an extra bathroom. Several years ago, my husband and I owned a condo that had a bath and a half and we loved having that extra bathroom. Then a couple years ago, we moved into a rental house with only one bathroom. It was hard to get used to with just the two of us, but now that we have a daughter, it would have gotten more and more difficult as she gets older. So...we are glad to have a second bathroom (even if it isn’t a full bath) once again in our new house! The only down side is that it was NASTY! As in, my husband and I were actually uncomfortable using the toilet in there and the whole room just grossed us out! It needed to be updated to really be a usable bathroom for us.
So, not even two months into living here, we got going on the basement bathroom. We thought it would be a good place to start for many reasons. Someday in the next year or so, we want to totally gut our upstairs full bathroom. We thought if we did the basement bath now, we’d at least have a “comfortable” toilet to use while the other bathroom is being updated. The basement bathroom doesn’t have a tub/shower, but just to have that extra toilet will really help. Also, we are in the process of updating the basement into actual livable space and since we painted the paneling down there, it made the bathroom look even worse and we just had to tackle the project.
We are thrilled with how it turned out! It has its imperfections, but man, it is SO much better! It feels like it just got updated by 40 years! I actually WANT to use that bathroom now! ;)
So, here’s what we started with...
 |
| Even the door had paneling on it! |
 |
| ...And even the vanity was paneled! (Check out how big the vanity is...it almost hits the toilet!) |
 |
| One last shot of the craziness before we got started! |
The before pictures aren’t the best, I know. I had just started priming the walls when we were getting started on the basement walls when I realized we didn’t have any before pictures. So I quickly snapped some with my point and shoot and got back to painting. The bathroom is small and is hard to get decent pictures of, so I did my best!
Once we got done priming the bathroom and priming and painting the rest of the basement, my husband and I realized how badly this bathroom needed to be updated...and fast! We started by pulling everything out and realized the vanity was extremely huge and decided we'd get a smaller one when it came to that point. It just took up way too much room and there was no need for all that storage in a basement bathroom! Once everything was out, my husband started on the tiling. We didn't want that nasty old tile in the bathroom if we were going to update everything else, so we bought some ceramic tile on sale at The Home Depot and got started. I mostly got in the way helped a little bit with the tiling, but left most of that part up to my husband. I am more of an instant gratification kinda girl and that just took way too long for me! ;) Once the tiling was done, we tried to decide where to go from there. We originally were going to do this bathroom for as inexpensively as we could, but then our personalities got in the way and we wanted it to look pretty, not just thrown together.
Board and Batten
I knew I wanted to do a board and batten wall treatment in the upstairs bathroom since before we even moved into this house. I don't even know where I first got the idea, but eventually I started looking around the interwebs at pictures and tutorials on how to install it. I was really excited about putting up the board and batten in the upstairs bath, but we hadn’t planned on doing it in the basement bath. My husband and I were standing around the bathroom talking about our options since the bottom had paneling and the top was some sort of contact paper or something. We talked about just painting the paneling on the bottom white so that it would give the room a little character, but we thought that it still might look a little cheap. Eventually decided that board and batten would be a good fix in that bathroom, too. The wall was already “divided”, so we just used that as our guide for our layout of the "b&b".
The hubby actually filled in the grooves of the paneling on the bottom of the walls, so you can’t even tell that it's paneling under that paint...well except for our crappy sanding job! Note to self, next time either hire someone to do the sanding, or spend A LOT more time on it ourselves! You really can’t tell if you aren’t looking for it, but there are some high spots in the “board” part of the b&b wall treatment that we didn’t sand well enough. Oh well, live and learn. And that’s one other reason we started our reno projects with the basement bath - we figured it was a good place to learn. If we messed up, it's only the basement, so not as many people will see it! Anyway, here are a couple pictures of the bathroom after the hubby filled in the grooves in the paneling.


Once that was done, we sanded and put up the b&b treatment. The floor is pretty uneven and the walls are all jacked up in that room, so we just started with the top board and made sure we installed that so it was level. Then we installed the baseboard and then the battens.

The battens were all different lengths - each one just by a little bit off from the one next to it - because the top board was level, but the baseboard was not - due to the unlevel floor. So we had to measure each one where we wanted it and then cut it to length.


Once that was done, we sanded and put up the b&b treatment. The floor is pretty uneven and the walls are all jacked up in that room, so we just started with the top board and made sure we installed that so it was level. Then we installed the baseboard and then the battens.
 |
| Top board and baseboard up. Ready for battens. |

Once we got everything up, I primed the walls and b&b and then painted the top part of the walls Accessible Biege by Sherwin Williams and painted the b&b Pure White also by Sherwin Williams. I used an eggshell finish for the top of the walls and a semi gloss for the b&b and trim. If I had to do it over again, I would still use the same paint, but I think I would have primed and painted everything before we installed it, and then just done touch ups when it was all installed. I think that would have saved a lot of time and stress. One of the bloggers that I found that did a b&b tutorial actually said that is one thing she would do differently next time and I DIDN'T LISTEN to her wisdom!! I should have! It takes a long time to paint all of the details of the b&b treatment. And, when you use semigloss paint, it gets a little tricky - especially with the second coat. I think it would have been much easier to paint the battens and mouldings on a flat/horizontal surface so that the paint wouldn't have run so bad. I had to be very careful and put the second coat of paint on very thin.
Here is the finished product!


Here is the finished product!


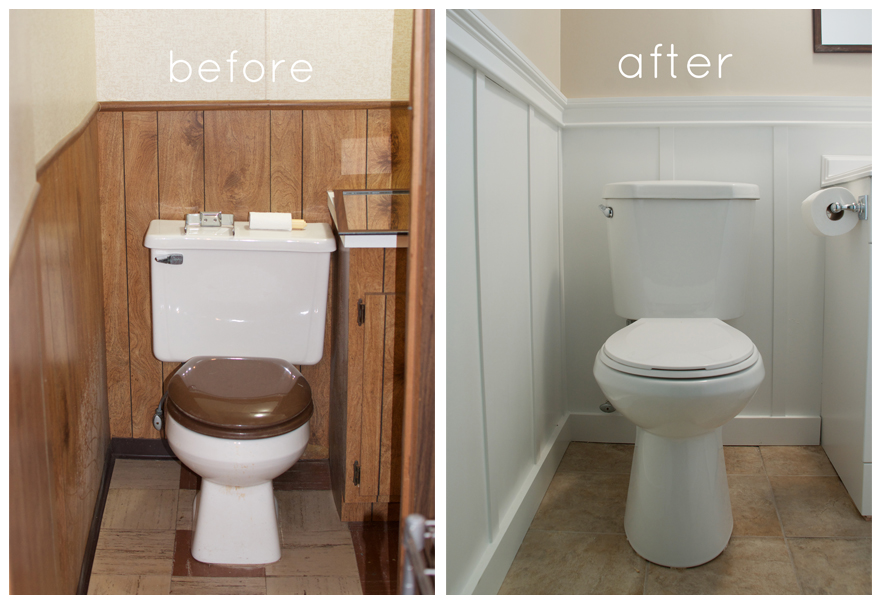 |
| And a before and after shot of the toilet area. What a huge difference! |
Well, that's it. Our first renovation project is complete. Well, almost! :) We still need to add the finishing touches, like caulk! And we need to add the "pretties". Like a new mirror and some sort of art - especially to cover that hole in the wall where the medicine cabinet used to be. Don't ask me why they had a medicine cabinet there. They had the biggest possible vanity that would fit in that room and they still needed a medicine cabinet? Doesn't make sense to me! Well, they hubby and I didn't want TWO mirrors in the bathroom, so we took that one out. We just need to figure out what to put over the hole now! :)
I'll be back with that and our new mirror once that all happens!
Oh, and one last thing...if you plan on painting trim and/or board and batten, check out this post. It helped me a lot!
Oh, and one last thing...if you plan on painting trim and/or board and batten, check out this post. It helped me a lot!
Take care!

No comments:
Post a Comment